Fall Inspired Crafts & Projects for Kids


Make a S’More
What You’ll Need:
Two cardboard squares *Tip: if you have a child who is really into building/creating with cardboard, we highly recommend this cardboard cutting tool for the adult helper to use
Cotton Balls
Brown marker
Instructions:
Press the Model Magic flat onto one cardboard square and smooth it out until it reaches all four sides of the square.
Glue cotton balls on top of the brown Model Magic.
Glue the second cardboard square on top of the cotton balls.
Add graham cracker patterns to the cardboard using a brown marker.
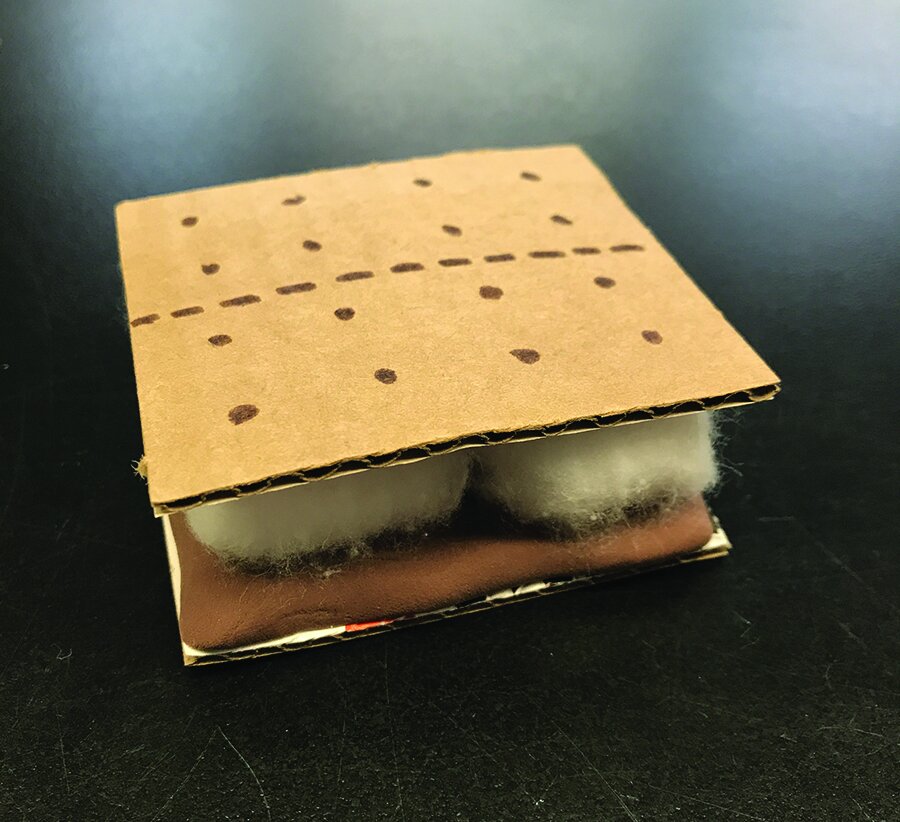
Cardboard S’More complete with cotton ball “marshmallows”
Create a Fall Leaf Garland

What you’ll need:
Oval shaped paper scraps - you can use construction paper or recycle some of your children’s old projects into new ones! *Tip: we recommend investing in some fun paper punchers like these to help make paper crafts!
Yarn
Hole puncher
Scissors
Beads
Instructions:
Select your number of oval-shaped paper scraps for your garland.
Using the hole puncher, punch two holes next to each other on each oval.
Optional (for older kids) - use scissors to cut the ovals into leaf shapes.
Weave leaves and beads through the yarn to make your garland.

Fall Garland

Autumn Printmaking
What You’ll Need:
Washable paint in fall colors (Crayola washable paint is by far the best!)
Scissors
Glue (you can also use hot glue for quicker results)
Wine cork (or something with a similar shape like a marker cap)
Paintbrush
Paper
Cardboard
Instructions:
First, you’ll need to make your stamps. Adults will likely need to help with this part! Cut a piece of cardboard in the shape of your stamp (we did a leaf shape and an acorn shape)
Cut and glue pieces of foam paper to your cardboard to make the leaf shapes. Look at our picture above for reference.
Glue your stamp to a wine cork or marker cap. Allow to dry.
Paint your stamps with washable paint. Stamp onto a piece of paper. Repeat using the other stamps and colors to make a pattern.
You can use the stamps you made over and over again. Simply wipe the paint off of the surface using a damp rag or paper towel.

Fall Printmaking
Construct Butterfly Wings

What You’ll Need:
Two paper plates
Scissors
Glue (you can also use hot glue for quicker results)
Markers
Wooden clothes pins
Instructions:
Cut one paper plate in half. These will be the tops of your wings.
Cut the second paper plate in half, then cut out the smaller circle halves in the center. These will be the bottoms of your wings.
Glue the bottom ends of the top wings together. Glue the top ends of the bottom wings together. Then, glue the bottom wings to the top wings, making a butterfly shape.
Decorate your wings using markers.
Glue a clothespin to the back of your wings, pointing down, so your wings can be clipped to your shirt.

Butterfly Wings
Draw a Squirrel in a Tree

What You’ll Need:
Drawing materials - markers, colored pencils, crayons, etc.
Pencil/eraser
Instructions:
Use our step-by-step guide below to sketch your squirrel using a pencil/eraser.
Sketch a tree for the squirrel to live.
Outline your pencil marks using markers. Color in using colored pencils or crayons.

Step-by-Step How to Draw a Squirrel
