St. Patrick's Day Crafts
March 16th, 2020 marks the day we closed our studio for COVID-19 for three months. We had prepared lots of fun crafts for St. Patrick’s Day. These crafts remained out in our dark & empty studio until the end of June when we finally were able to re-open. So, it is extra fun this year to finally see kids getting to do our St. Patrick’s Day crafts in the studio! We’ve shared some of our favorite St. Patrick’s Day crafts below. We have something for every age group. Let us know if you try any of these projects at home!

St. Patrick’s Day crafts for kids of all ages!
How To Draw A Leprechaun
What You’ll Need:

Pencil/Eraser
Drawing Paper
Markers
Colored Pencils or Crayons
Instructions:
Use a pencil with an eraser to sketch your Leprechaun. Use our step-by-step guide below.
Outline your pencil lines with a dark colored marker.
Fill in your Leprechaun with color. Use a mix of markers, crayons and colored pencils.
Don’t forget to add details in the background such as rainbows and gold coins!

Step-by-step how to draw a Leprechaun guide

Shamrock Paper Marbling
What You’ll Need:

Toothpick
Popsicle stick (or something similarly shaped)
Scissors
Cardstock or watercolor paper (we love this paper by Canson)
Tray - you can use a basic craft tray like this one or use a rimmed baking sheet
Pencil
Instructions:
Spray shaving cream into your craft tray.
Squeeze small drops of liquid watercolor onto your tray.
Using a toothpick, carefully swirl colors around. Be careful not to mix too much or you’ll lose the swirl patterns. Continue until you have lots of fun and swirly patterns.
Stamp your cardstock paper face down onto the shaving cream patterns. Peel the paper up. Use a popsicle stick to scrape off the extra shaving cream.
Once all of the shaving cream is removed, sketch a shamrock shape on your marbled paper using a pencil. Use our step-by-step guide or design your own.
Cut out your shamrock.


Green Rice Sensory Bin
What You’ll Need:

White rice
White vinegar
Food coloring
Scoopers - these are great for helping build fine motor skills
Container - large plastic storage tubs work great, especially the ones meant for under the bed storage. Busser tubs are also great for sensory play!
Tray - you can use a basic craft tray like this one or use a rimmed baking sheet
Instructions:
Scoop 1 cup of white rice into a plastic container or a large resealable baggie.
Add 1 tsp of white vinegar and a few drops of food color to your rice. Seal container and shake vigorously.
Pour colored rice out on a tray and allow to dry.
Once rice is dry, add it to a bin or tray. Add gold coins and scoopers for some fun sensory play.


Make a Pot of Gold
What You’ll Need:
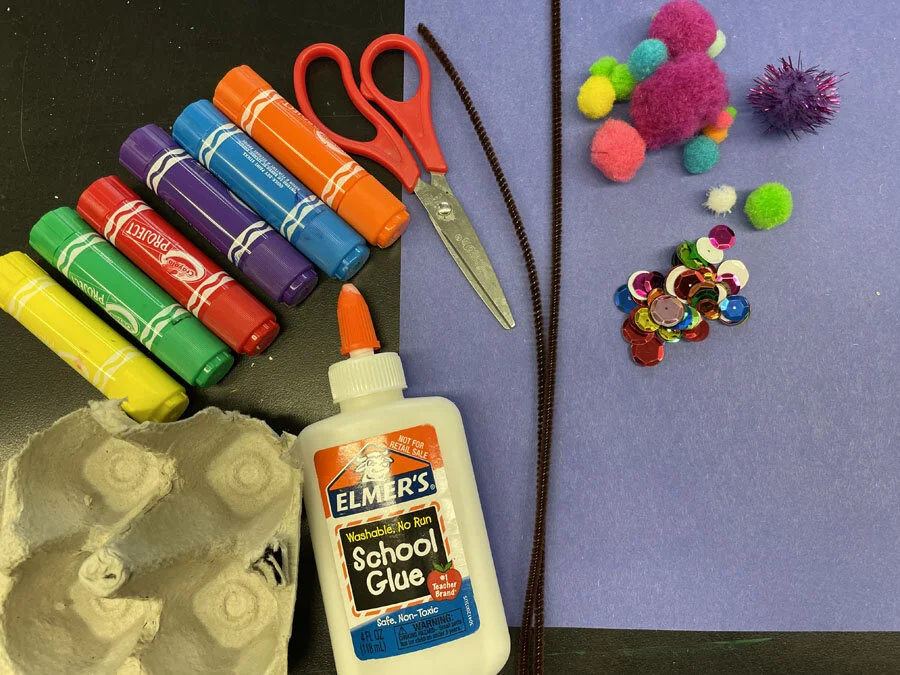
Quick dry paint sticks (we like these by Kwik Stick and these by Crayola)
Construction paper
Sequins
Puff balls
Scissors
Recycled egg carton
Instructions:
Cut off a piece of an egg carton. Color it using a quick drying paint stick and allow to dry (takes about 2 minutes).
While your egg carton dries, “paint” your rainbow on a piece of construction using quick dry paint sticks. Add grass to the bottom of the page.
While the paint stick dries, make your pot of gold. Cut off a pipe cleaner “handle” for the pot. Poke holes in either side of the pot and loop the pipe cleaner through. Glue puff ball “gold” in your egg carton pot.
Glue your pot of gold at the end of your rainbow.
Decorate the background by gluing sequins and puff balls to the paper.

Fingerprint Rainbow
What You’ll Need:
Washable Paint (we use Crayola brand because it is non-toxic and cleans up really easy)
Paint rag or wipe for messy fingers
Pencil/eraser
Markers
Optional: Crayola Glitter Markers
Instructions:
Using a pencil/eraser, sketch your pot of gold in the bottom corner of your paper. Use our step-by-step guide below or design your own pot. Outline your pencil lines with a dark colored marker.
Color in your pot using crayons. Optional: Use Glitter Markers to draw in the shimmery gold. You could also use glue/glitter for this step if you’d like.
Dip your finger into washable paint. Stamp your finger onto your paper to form the rainbow. Continue with each color until your rainbow is complete. Make sure to wipe off your finger before switching colors to avoid colors mixing.

Step-by-step how to draw a pot of gold guide

Paper Shamrock Wreath
What You’ll Need:
Paper plate or a piece of cardstock paper
Ribbon
Scissors
Hole Puncher
Green paper cut in heart shapes (we used a paper puncher like this one to create the paper hearts). Use various shades of green paper. You can also recycle old green paintings or use magazine clippings.
Instructions:
Cut out the center of your paper plate. If you’re using just a piece of cardstock paper, cut out a large circle. Cut a smaller circle out of the inside to create a wreath-like shape.
Cut out lots of green paper hearts.
Make shamrocks by gluing together 3 green hearts.
Glue your shamrocks around the wreath circle.
Punch 2 holes in the top of your wreath. String green ribbon through and secure by tying.
