Halloween!

Halloween is always such a fun time to get creative with the kids. Today on our blog, we’re sharing a few of our favorite Halloween crafts.
Burlap Scarecrow
This is a great project to help introduce sewing to little kids! If you have no sewing experience or don’t have the materials on hand at home, just use glue, scissors and fabric scraps to make your own scarecrow!
What You’ll Need:
Burlap
Embroidery floss and/or yarn
Fabric scraps
Scissors
Plastic needle
Wiggle eyes
Stuffing - you can use polyfill or just ball up fabric scraps or paper towels
Embroidery hoop (wooden or plastic)
Instructions:
Take a piece of burlap and insert it into an embroidery hoop.
Thread yarn or embroidery floss through the plastic needle. Make sure to tie a knot at the end! *Tip - for younger children, tie the yarn to the needle to prevent it from coming unthreaded every few stitches.
Start by creating the scarecrow’s eyes. Apply fabric scraps and stitch them down. You can also just glue the fabric and google eyes on! Next, stitch a nose and a mouth for the scarecrow.
Take a second piece of burlap for the backing. Stitch around three out of the four sides, leaving an opening for stuffing.
Stuff with either polyfill stuffing, fabric scraps or paper towels. Stitch the remaining side closed. Again, you can also glue your scarecrow pieces together if you prefer!

Patterned Pumpkins
This project was inspired by the patterned pumpkins of Japanese artist Yayoi Kusama. It is a good lesson in patterns as well as watercolor techniques.
What You’ll Need:
Instructions:
Sketch out your pumpkins using a pencil/eraser. Outline the pencil lines using a permanent marker.
Add patterns using oil pastels or crayons. Make sure to add different patterns to each of the pumpkins, the table and the wall.
Fill in color using watercolor paints. Paint right over the marker/crayon lines as it will resist the paint.
Fill up the entire page with color!

Recycled Marker Monsters
As you can imagine, we go through lots and lots of markers in the studio. Once a marker dries out, we usually make watercolors with the tips. This leaves us with lots of marker caps. We're always looking for fun ways to create with them. For this project, we wrapped marker caps in yarn and decorated them using wiggly eyes, pipe cleaners, tissue paper and construction paper. If you don’t have marker caps lying around you can also re-purpose wine corks or toilet paper rolls.

Tissue Paper Monsters
We make lots of tissue paper flowers in the studio. For this project, we turned them into fun monsters by decorating them with construction paper and glue. See below for a tutorial.

What You’ll Need:
Tissue paper & collage paper
Scissors
Pipe cleaners

Witch Paper Dolls
Who else remembers making chain paper dolls when you were a kid?!? We thought this would be a fun decoration for Halloween! Kids can use our witch template, or come up with their own shape. See below for a simple tutorial.
What You’ll Need:
Pencil/eraser
Scissors
18” long construction paper
1 piece of white paper or cardstock to create a “template”
Instructions:
Take your long paper and fold it back and forth accordion style.
Create a witch template (see picture below). Note - the width of your template must be the exact same width as your folded paper.
Trace your template onto your piece of folded paper.
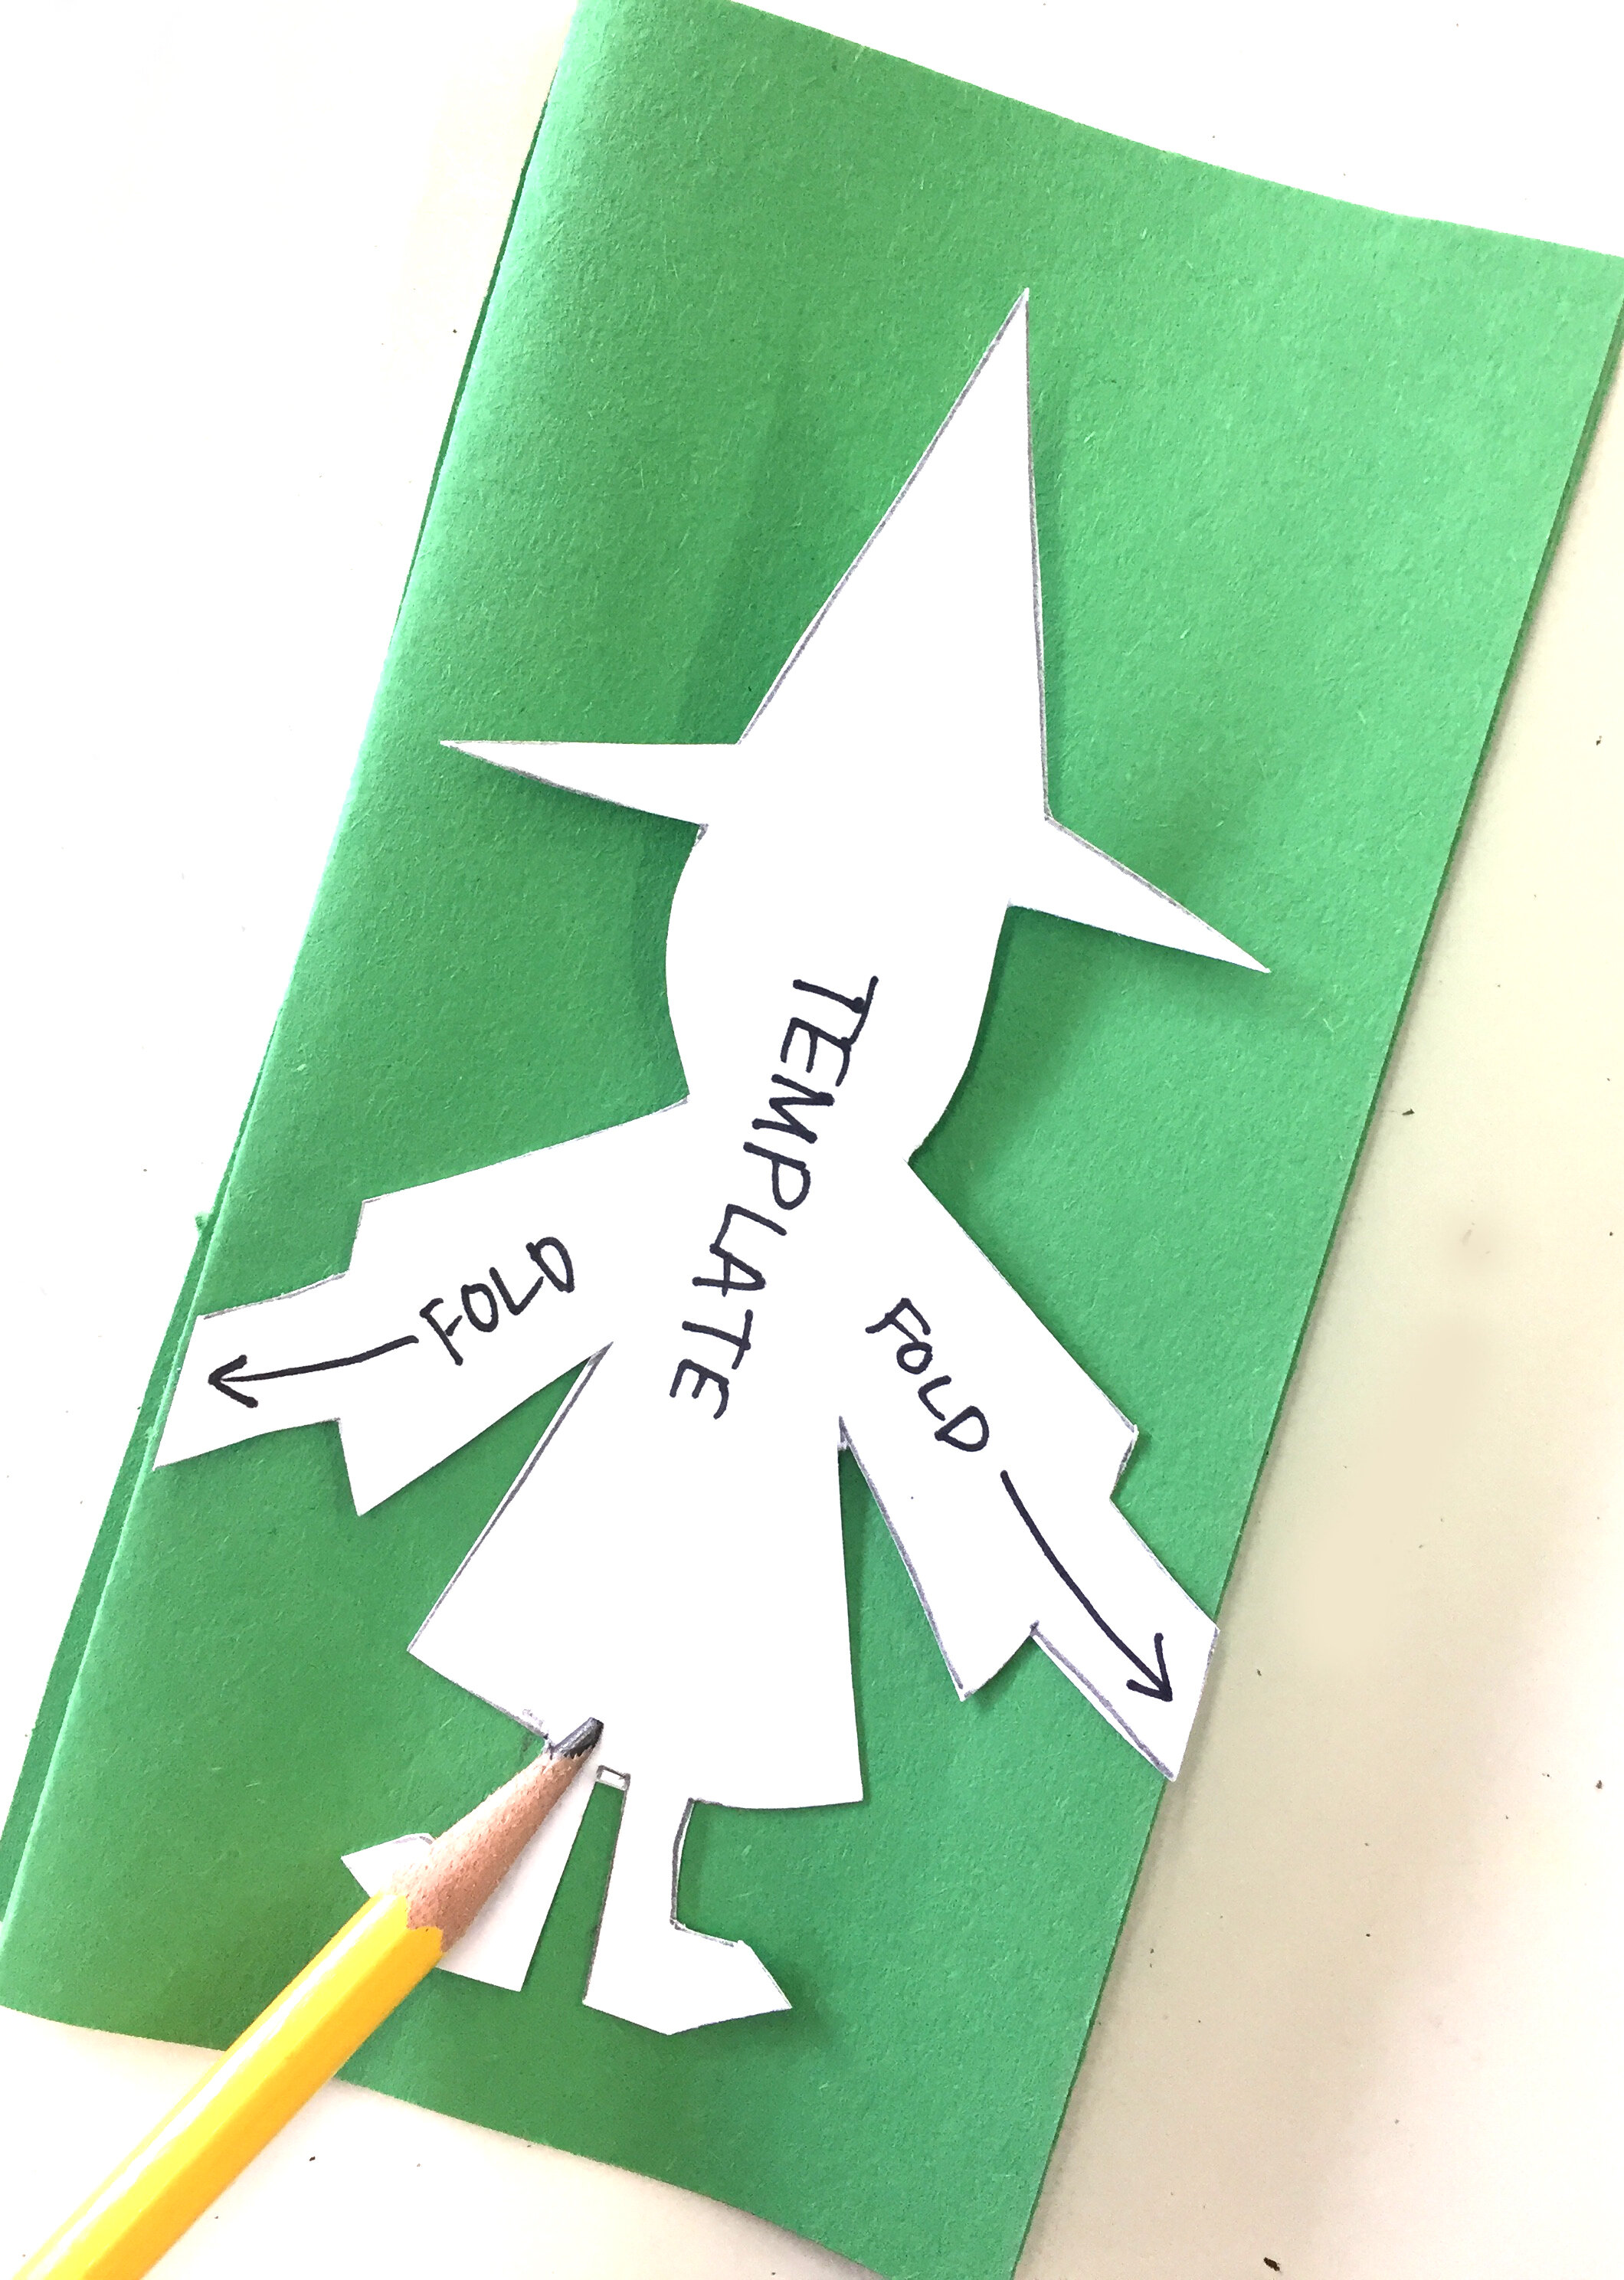
4. Carefully cut out your witch through all layers of the paper. Make sure you do not cut through the “fold” line where your witches will connect
5. Unfold and enjoy your paper dolls. These make great decorations. Feel free to try other shapes (pumpkins, ghosts, etc) *Don’t get discouraged if you don’t get it right on the first try! Sometimes you may have to make a few “mess ups” to figure out how to get it just right!

Halloween Garland!

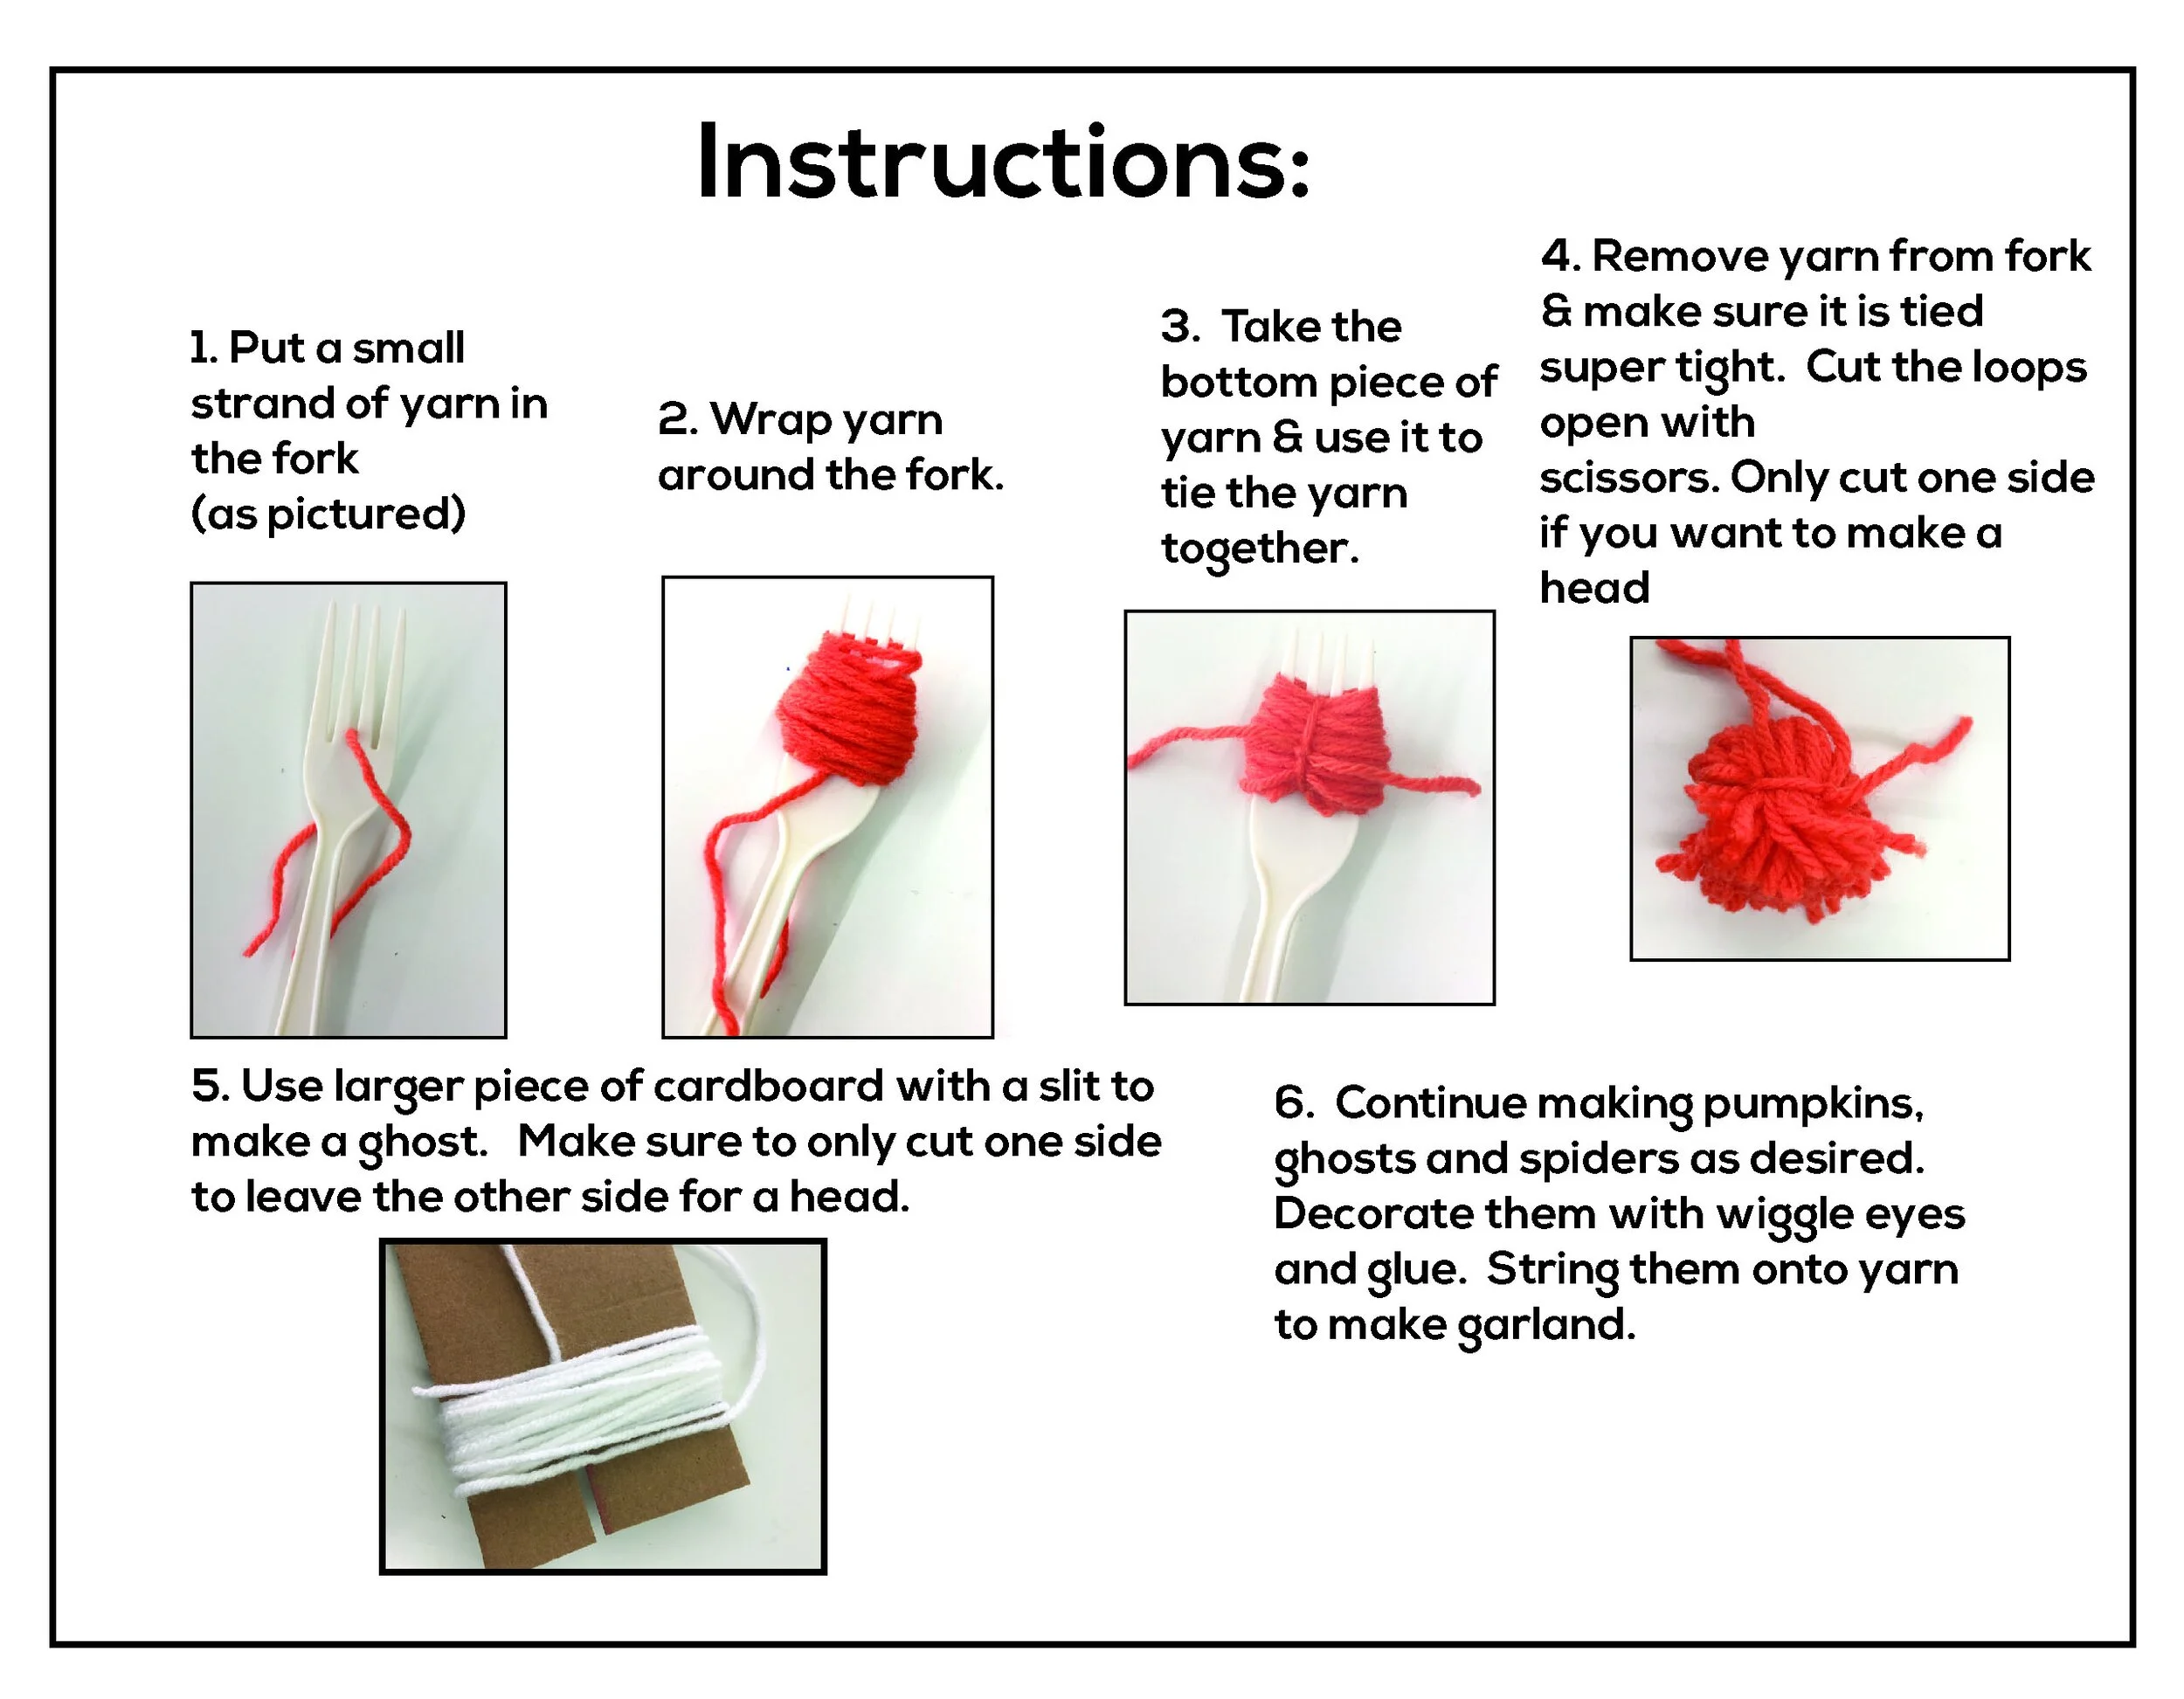
We took a basic yarn puffy ball and turned it into a fun Halloween decoration. Below is a how to guide for making yarn balls. Making yarn balls is a great skill for older kids to learn, as they can be turned in to all sorts of fun projects.
What You’ll Need:
Scissors
Wiggle eyes
Yarn
Halloween Origami
These two projects are great to introduce kids to the world of origami because they are pretty simple and fun.
What You’ll Need:
Origami paper *If you don’t have origami paper on hand, you can use any type of paper as long as it is cut into a square shape.
Scissors
Construction paper scraps
Glue stick
Drawing materials (you can use pencils, markers, crayons - whatever you have on hand)

